In Architectural Visualisation digital material makes all the difference. Let me show you some fundamental Cinema4D features to create physically correct surfaces.
Creating a good texture may seem a confusing matter in the beginning. One reason: There is no standardized material system in computer graphics today. In fact, each renderer has a system of its own, creating lots of compatibilty issues that drive everyone crazy. Now think of it: Cinema4D itself has 3 built-in photorealistic renderers. And it allows to run many more 3rd-party renderers as plugins, among them Renderman, Arnold, VRay .
Then again, basically all those digital material systems work the same way. And you’ll find tons of info about it – not least in Cinema4D’s manual. However, I thought it useful to write down some basic rules how to set up a material properly. Here you are:
- Digital Material and Mapping
- The Foundation: Diffuse
- Bitmaps and Procedural Shaders
- Reflection Basics: Scattering
- Reflection Basics: Fresnel
- Reflection Basics: Masks
- Bump and Normal maps
- Displacement
- Create Digital Material: But which one?
- Roundup and useful Links
Disclaimer: In this article I won’t talk about C4D’s new Material Node Editor. Why? Well – first of all this is a massive subject worth an article on its own. Most important though, at least with C4D R20: It doesn’t play with C4D’s new GPU-based, fast ProRender. Which again I utilize a lot – which is stuff for another piece to write.
I will cover Diffuse, Reflection, Bump / Normal mapping and Displacement. I will also talk about bitmaps and shaders.
I will not cover Transparency (this is pretty straight-forward) and Sub-Surface-Scattering (no average use-case). Also, no Alpha-mapping because this definitely belongs into an article on modeling. Also, I don’t describe Luminance since this is a lighting issue.
Now to start, first let’s get a common misunderstanding out of the way:
Digital Material and Mapping <
While you may have created 1.000+ materials inside your Material Manager …

… maybe none of them is applied to any of your objects:

What am I talking about? Let me explain. Materials are little files that you create and store with your project. They live inside the Material Manager. (In C4D, panels are named manager.) In order to actually use one of these materials you must drag them onto one of your geometry objects (in the viewport or in the Object Manager).
Only then will your materials be rendered. So keep this in mind – creating a digital material and utilizing it in your scene are two different things.
This relates to how you handle the two issues. When you assign a material to a scene object a tag will appear right beside this object in the Object Manager list. It’s a Texture tag:

You click this tag once, Attribute Manager below informs how the material is projected – aka mapped – onto the object. This can be done differently for each object according to its geometry:

You double-click the same tag and Attribute Manager shows you how your material is composed. That has nothing to do with its projection mode:

Recap:
- Digital Materials are abstract objects populating the Material Manager.
- They render only when mapped on a scene object.
- When mapped, the according object receives a Texture tag.
- One-click a Texture tag: In the Attributes Manager, see the materials’s projection parameters. These may be different for each object the material is mapped on.
- Double-click a Texture tag: In the Attributes Manager, see the material’s properties. These are global.
To open the material’s properties you may also double-click its icon in the Material Manager. A window shows up allowing for the same adjustments as in the Attribute Manager:

The interface is slightly different – it’s up to you to chose which window works better for you.
Material mapping and projection issues are not my subject here. For a quick overview be sure to check with Cinema4D’s manual.
The Foundation: Diffuse <
In reality we see a surface because it reflects color. (See next chapter.) The color we see is a composite: one part coming from the object itself, the rest coming from environment reflections. The mixing ratio differs according to the surface material. In computer graphics, for handling purposes this reflection composite is split up between:
- The base color, image, shader – showing color information coming from the object.
- The reflection map, or a layered stack of them – showing color information coming from the environment.
The base color (which may also be an image or a procedural shader) is called Diffuse in CG vernacular. Let me show you how to implement it in Cinema 4D. In the Material Basic settings be shure to check only Reflectance:

Now you’ll deal with the settings in the Reflectance tab. (The Material settings tabs named Illumination, Editor and Assign are standard and nothing to care about at the moment.)
When you enter the Reflectance settings you may be overwhelmed by the many options that show up. But there is a structure to it.
First of all, when you single out the Layers tab at the very top (marked yellow) you’ll see only the stack of layers which are populating your Reflectance channel at the moment:

When you click on the Layer 1 tab (the name may differ), you’ll see first of all which kind of channel it is:

What might confuse you: We are inside the Reflectance channel here but actually look at a Diffuse. As I said above Cinema4D’s digital material system splits surface reflection into parts – you might also call them layers. And here we are: What you see in the above image is a Diffuse layer in the Reflectance channel:
- It shows yellow color – in my example (Color).
- It doesn’t seem to reflect anything besides yellow.
- It’s Type is Diffuse (Lambertian (Diffuse))
OK, this looks like something basic. And, as it is a layer, it invites you to stack more layers on top of it. You do this by clicking on Add…

… and pick the Type of layer you want. If you need another Diffuse (yes, you may have more than one), choose Lambertian or Oren-Nayar. As I know of no difference between the two (which doesn’t mean there is none) I always pick Lambertian because it’s the first. In case you wonder how to merge Diffuse layers: You can tune down each layer’s opacity and/or change the Blend mode from Normal to Add:

This being said I suggest you stay with one Diffuse layer only. Why? Because if needed, a complex compositing of several colors, images, procedural shaders is better done using Cinema4D’s mighty compositing shaders. I will talk about that in a minute.
First of all I want to show you the basic options you have to compose your Diffuse. Color, of course. In the material’s Reflectance settings you can unfold the color sliders in the Diffuse Layer Color tab:

This should be a no-brainer as you may have used something like this a thousand times before. However a plain color will most often not be enough. So what about bitmaps or shaders? For this, I have reserved a chapter of its own.
Bitmaps and Procedural Shaders <
Let’s stay with the Diffuse layer for the moment. Mind you, however: Bitmaps, shaders or a compositing of the two can be utilized in many channels. And not only in digital material compositions but also in Mograph Cloners, Deformers etc. Basically in every effect or tool in Cinema4D that can be controlled by a texture map.
So if you need a bitmap-based texture for example you’ll want to load an image into your Diffuse:

After picking the Load Image command you choose a bitmap from one of your folders:

Cinema4D asks if it should copy the bitmap into a new folder or not:

Why the choice? Because your project file will reference this bitmap file the question about the file path is crucial. I won’t delve into this, just read the manual. As practical advice though I recommend choosing No and later Save your Project with Assets:

This way C4D will create a Tex folder together with your project file and copy all images you use in the project into this new folder – wherever they come from.
Back to our Diffuse: Now that a bitmap is loaded, the color is overwritten since the Mix Mode is set to Normal:

Feels familiar? Right, that’s exactly the same as Photoshop’s Layer Blend Modes. For now, I’ll leave it at that. Again, feel inspired to check Maxon’s manual.
Instead of an image, you may want to use a Procedural Shader. The No.1 shader is a Noise:

Noises are extremely useful:
- They don’t tile.
- They use random generated patterns.
- They are scalable.
- They can be animated.
- There are some 30 different types to choose from.
- Via various settings their graphics can be tweaked indefinitely.
- They are stackable, thus enabling even more variations.
And you can also layer them with images, so they let you overpaint your bitmaps if you so wish.
As an example, click on the square miniature of the Noise to enter its settings:

Here you are. Pick the Noise flyout menu and pick another one out of the list:

I’ll highlight the most important settings for you to start with:

I suggest you play around with these values to see what they do.
Now as I said, noises and images are stackable. I’ll show you another important feature. Besides graphics-generating shaders (like images, noises, gradients etc.) C4D offers compositing tools. One of them is the Layer “shader”. (In Cinema4D, all tools concerning texture-generation are called shaders.) So if you switch back to your Diffuse settings, from the Texture flyout menu choose Layer:

Choosing Layer does not delete your former input (Noise in this case). It takes its place at the top of the Texture hierarchy and integrates it on a sublevel. Check the Layer miniature (that shows the Noise) to see its settings:

Now you see the list of layers, your Noise being the only one for now. To add more layers click on one of the above buttons, like Shader:

And as you see, the choice is the same as a level up in the Diffuse Texture menu. So, here’s a structure that allows you to endlessly stack image information via layers, using blend modes and opacity values as you wish:

A simple 3-layer-stack – put into the Texture slot of the Diffuse Layer Color (of the Reflectance channel):

The layer stack looks like this:

You see two Noises and a Tiles shader in between. The noises supply the image information, their layer blend mode is set to Normal. The Tiles shader serves as a mask between those noises, its layer blend mode is set to Layer Mask (surprise!).
The Tiles shader is versatile when it comes to geometric patterns. Of course you may use every greyscale map as mask, also another noise. To satisfy your curiosity, a Tiles looks like that:

You may choose a Pattern, Colors for Grout and Tiles and a Scale … And here’s the thing: If you want to use the Tiles shader for masking, you can utilize the option Randomize Color and use different greys as Tiles Color:

This subject is endless. And definitely more stuff than I can talk about here. Feel inspired to research C4D’s documentation.
Also, there are many more tools C4D offers to create textures: the Fusion shader, the Distorter, Gradient, Colorizer … to name but a few. They are all summarized here.
So again: Bitmaps, shaders and combinations of the two are ubiquitous in Cinema4D. And in every other renderer, for that matter. Composing maps and utilizing them in digital material channels, generators etc. is common and everyday practice. But now let’s go back to our subject: setting up a decent material. And this simply doesn’t work without reflection.
Reflection Basics: Scattering <
In Cinema4D, you add reflection to your surfaces via a reflection layer inside the Reflectance channel – a Beckmann for example:

Having done that you are supposed to finetune the reflection values – not very intuitive at the beginning. So let’s first talk about reflection principles and how they are implemented in Cinema4D. For this subject and C4D’s mighty Reflectance channel, also check the manual.
What do most digital material systems in computer graphics have in common? It’s their physical approach: Today, materials are capable of visualising real-life effects via complex reflection algorithms. The paramount acronym you’ll hear a lot these days is BSDF. It stands for Bidirectional Scattering Distribution Function. And what it describes is a material’s characteristic way of scattering reflection rays.
What does it boil down to? Think of a material as a light filter. Via light (sunlight, artifical light, whatever) it receives a vast range of colors. But then, it just swallows down the biggest part of it and transforms it into thermal energy. This is called absorption:

A small part, however, is not absorbed but reflected: That’s the color you actually see. For example, the sphere in the image above appears blue because it has absorbed all spectral colors but blue. It reflects blue color.
As you see, reflection basically means that we see anything at all.
Yet, most people think of reflection this way:

In fact, both of the above images show reflective surfaces. The difference between the two scenes is the reflection geometry:
- In the top image, lots of reflection rays bounce in all directions.
- In the bottom image, few reflection rays bounce in one direction.
In other words: The above window shows (extremely) blurry reflection, the bottom image shows sharp reflection:

And here we are again: Material surfaces look special because of the way reflections are scattered. Hence the Acronym: Bidirectional Scattering Distribution Function, in short: BSDF.
Need more on this? Check Cinema4D’s manual.
In Cinema4D’s material settings, scattering is adjusted via Roughness:

The setting is located in the Reflectance channel:

Mind you, Roughness means Scattering. It has nothing to do with Bump or Displacement – that’s another story. We’ll come to that further down. But before that, let’s talk about just one other feature belonging to reflection.
Reflection Basics: Fresnel <
Scattering characteristics are one aspect of reflection – Fresnel is another one. Looking at a water surface you may observe something like this:

The water surface changes between being nearly 100 % transparent to being nearly 100 % reflective. The respective effect depends on the view angle: The more tending towards vertical, the more transparent the water appears, and vice versa.
Speaking in terms of your renderer: What you observe is in fact a gradient mask between two material effects: transparency and reflectivity. This phenomenon – you may have guessed until now – is called Fresnel.
When we take transparency out of the equation what stays is that Fresnel on a reflecting surface controls the reflection amount in relation to the view angle. Now as I said this effect is an aspect of reflection (and transparency). Materials look different because:
- They reflect differently, i.e. their Scattering Distribution varies (see Reflection Basics: Scattering).
- Their reflection amount changes according to the view angle, i.e. their Fresnel varies.
Fresnel is measured in IOR, meaning Index of Refraction. Here you see four surfaces with the same base color reflecting the same sky map. They look quite different though because of their IOR:

As you can see, an IOR of 1.0 eliminates reflection completely. A high value like 10.0 turns the surface into a mirror. Values between those extremes show various gradients between base color and reflection map.
As for Cinema4D: It makes it quite easy to handle Fresnel. In the Reflection layer settings, just move down, past Color and Mask, to Layer Fresnel:

Here you are offered a bunch of presets to choose from. C4D differs between Dielectric and Conductor, the latter meaning metals. Choose what you need, you’ll find a respective list of presets:

Most of the time, picking a preset that will match more or less will do – like asphalt, if you need, let’s say, an IOR for concrete.
Of course C4D allows you to endlessly finetune the IOR, even modulate it with a greyscale mask:

Reflection Basics: Masks <
Scattering and Fresnel are distinct features of a reflection – but of course there’s more to it than that. For example, real-world-surfaces are most often not perfect but show irregularities:
- Rust
- Scratches
- Material-specific irregularities like wood grain
- Module-specific Color differences (bricks, tiles wooden formwork)
To visualize those deviations from perfectness, we use masks – greyscale maps that overlay basic surface features like color, roughness, reflection amount, fresnel etc.
To compose maps please refer to my above chapter on Bitmaps and Procedural Shaders. But where do you use them, precisely? Let’s see.

The image shows a surface with a Diffuse and a Reflection layer. The lines are supplied by a Tiles shader in the Diffuse, their sole purpose is to add some perspective depth to our example image.
When talking about using masks for reflection the first slot that offers Texture input is in the Layer Color tab:

With a high-contrast greyscale image, the result looks like this:

You see it’s not necessary to roughen up the Diffuse image – using a noise map in the Reflection is far better as it affects the reflection amount which makes it look much more real. As you can see in the settings above, Mix Mode is set to Normal – which makes sense most of the time – but Mix Strength is dimmed down to 50%. This is a value worth playing around with.
Now let’s switch off the Diffuse for a moment:

This way it’s easier to assess the impact of our noise map. (You may have guessed already: I use the term noise map as a general expression for a greyscale map meant to modulate our reflecting surface.)

OK, this was the Layer Color Texture slot. Now let’s try the next one, Layer Mask – also with Mix Strength set to 50%:

And: The map was removed from Layer Color. Now, this is the result:

As you see using the noise map in either Layer Color or Layer Mask makes no difference – at least I don’t see any.
Now, next station, Layer Fresnel. Remember, this is an important setting. Here we have several options. First we use the Texture slot for Strength:

This is what it looks like:

Compared to the images above it looks rather weird – the bright parts of the map just eliminate the Fresnel. And it doesn’t help that the map impact can’t be dimmed, as in the layers above.
Now let’s try putting the image into the IOR Texture slot:

The first impression is pretty dull:

But what if we switch on the Diffuse layer again?

And to be able to tune the map’s impact, replace it with a Filter shader:

Similar to the Layer shader, the Filter does not remove the bitmap but replaces it on the first Texture hierarchy level. One click below are the settings. Play with Brightness and Contrast like this:
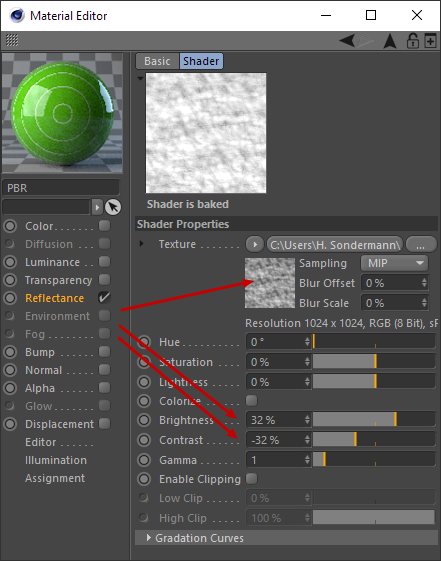
And suddenly using a map in the Fresnel layer starts making sense again:

Compare this with the result of using the same map in Layer Color, with 50% Strength:

To sum it up: At least in this example, using the map in Layer Color or Layer Mask produces a much more realistic digital material surface than using it in Layer Fresnel. However in Fresnel, by using the Filter you may achieve different results that may also fit your purposes.
Bump and Normal Maps <
After Diffuse and Reflection, there is a third major feature to a material surface: a degree of Unevenness. And here things start to get confusing. In my chapter Reflections Basics: Scattering I said that Roughness resembles Scattering – it controls the distribution geometry of reflection rays.
It does not resemble any kind of natural unevenness which every real-life-material shows to some degree. Be it small or big scale.
So, the CG effect for visualizing an uneven surface is not Roughness but a Bump map. You may also have heard of Normal and Displacement maps. What’s the difference?
In this example, we used a bump map. Watch the surface and also the edges:

The surface is bumpy, the edges straight. How did I do this?

I used a greyscale bitmap in two locations: First in the Diffuse layer – Bump Strength unfolded, I chose the Custom Bump Map Mode and put the bitmap into the Custom Texture slot. Strength is set to 100% to achieve a distinct result. ( In most of the cases, a lesser value will suffice.)
The second location is the same slot in the Reflection layer:

As you see I chose the same settings.
Now I want to use a Normal map instead. Compare the outputs:

A normal map produces a smoother surface – basically because the map “moves” the pixel in all positive directions, whereas the bump map only elevates them in Y-direction. And there’s a huge difference in render time -with a normal map, rendering is nearly 4 times faster in this example.
A normal map is an RGB image looking like this:

You put it into the same slot as you would use for the bump map (shown above). The only difference is that the Bump Mode is set to Custom Normal Map:

Now you may ask where to get a normal map from? Well, you can buy them, have software like PixPlant produce them for you, or you use Cinema4D’s Normalizer shader. I strongly recommend PixPlant as its main job is to turn every image you take into a professional, seamless bitmap. And while doing so it allows to also mute brightness issues and deliver diffrent outputs for diffuse, reflection, normal and displacement channels. Take a look at the collection I used for the above images:

Now as I said above there are different ways to produce uneven surfaces. Two of them – bump mapping and normal mapping – do this by basically by faking the respective deformation. Depending on the light angle the illusion of unevenness can be quite convincing, but the edges reveal that the geometry has not been altered.
Displacement <
An actual deformation on geometry-level, however, is only available via displacement. For this, we will have to leave the Reflectance channel for now and make the Displacement channel available too:

Needless to say, the bump resp. normal maps have been removed from the Reflectance channel – you don’t use displacement and bump with the same map.
The result is different, especially when you look at the edges:

This is a real geometry deformation via map. Which is actually pretty cool – it means that complex surface geometry can be achieved by using a texture.
But there is a price to it: We have to enhance the object’s subdivision significantly to make displacement work properly:

And this results in higher render time, of course:

So you have to make an educated decision which kind of surface deformation to choose. I should say however that displacement allows for a lot more effects than normal maps do. Check this out for an overview.
Create Digital Material: But which one? <
As I said in the beginning, a material system is renderer-dependant. So, if you use Octane renderer inside Cinema4D for example you’ll have to use Octane’s materials system.
Now, even without an external renderer Cinema4D’s materials system has become a bit confusing over the last years. Let me give you a short guide what to choose.
First of all make sure you know which renderer you use:
- Standard
- Physical
- ProRender
The choice is made in the render settings (STRG-B):

A general explanation concerning Standard and Physical renderer can be found here. As for ProRender, see here.
When you read the manual you’ll learn which aspects of a material setup are optimal for the respective renderers. As for the instructions above and the examples I show: I used ProRender – it’s fast, easy to set up and GPU-based. That being said, it should be obvious that ProRender is much more fun with a descent graphics card (I use a Nvidia GTX 1080).
Now let’s check out C4D’s Material Manager what it has to offer. Open the Create menu:

PBR Material
There is a lot to choose from. Let’s pick the first: New PBR Material. This creates a “normal” C4D material where everything is supposed to happen in the Reflectance channel: Diffuse and Reflection:

So this is exactly the kind of material setup we did in the above chapters. Remember: I told you it’s all about a physically correct resemblance of reality, described by the acronym BSDF. So here it’s called PBR Material which stands for Physically Based Rendering – which is supposed to mean the same.
Not to forget: In the Reflectance channel we even did bump and normal mapping.
New Material

This is the same as the above PBR, just with less “physically correct” default settings: The diffuse part is done in the Color channel and Reflectance is by default meant to supply a specular:

Now this is very old-school, using specular – I would not recommend waste time on learning how to use this fake-reflections-feature.
But, as you see, since PBR Material and Material are identical – only with different default settings – you can use either of them and just pick your favorite settings. Actually I find it a waste of screen space to offer both in one menu – also confusing for beginners.
Shader
Next item: Shader. This is a collection of so-called volume shaders, some of them really, really old:

As these are more like special effects than materials we won’t delve into this here.
New Node Material

This one allows configuring material channels via Nodes. A New Node Material looks like this:

As it’s all about ther Node editor, you are supposed to open it and start connecting Nodes (components with inputs and outputs) to compose a material:

On the one hand, it is a much more efficient way to compose a material. For example, there are no redundancies any more concerning the use of shaders in more than one channel. On the other hand: For a simple material it may be a bit overdone stitching together nodes instead of just configuring a material the old way (like shown in the above chapters).
I love it nonetheless – it’s so much more versatile. But as said right at the beginning, using the Node editor is no minor issue and worth an article of its own. And, as for now, it does not work with ProRender anyway. This is surely coming in one of the next upgrades though.
New Uber Material

An Uber Material is a user interface of a Node-composed material – looking like a “classic” Cinema4D material:

But it is more or less empty – because it has to be composed in the Node editor in the first place. Hence the respective button down left.
So actually, it’s more like a template that has yet to be filled. And again, like with normal and PBR material, it feels a bit redundant to have New Node Material and New Uber Material in the menu as they relate to something identical.
Node Materials

This is a submenu offering ready-made Uber materials (or Node-based materials, for that matter). And it’s actually quite useful to get your hands on some best-practice example of Node compositions. Also, their interface allows you to actually use & tune them:

Again, good to get acquainted with C4D’s new Node system, but not an issue in this article.
Roundup <
So there’s that – in “classic” Cinema4D’s material system, some basics you should know about composing a decent material surface.
Mind you: This is merely a foundation for you to start from. Creating materials is a skill that has to be trained like everything else. So feel inspired and get started!
Links:
Tips on using ProRender: See here.
Fantastic video on PBR workflow by Digital Meat: See here.
Literature: Jana Hlinková, Modeling Bidirectional Scattering Distribution Function, BA-Thesis, Bratislava 2007
© 2018 / Horst Sondermann / All Rights reserved


Leave a Reply
You must be logged in to post a comment.